
We’re excited to announce the launch of the Rivalz Intel Incentivized Testnet on Dymension. This marks the first step we take towards building an AI Intel layer – a decentralized peer-to-peer network for modular AI-apps, enhanced by programmatic trust and privacy.
Throughout this event, users will be able to actively participate in the rollout of Rivalz’s decentralized node infrastructure, earn points in various activities and get rewarded based on their overall engagement with the Rivalz Testnet.
Participating in the Testnet
During the testnet users can earn Testnet Points. These will directly dictate the Rivalz $RIZ airdrop – set to happen in early Q3 2024. High positions on the leaderboard will receive additional rewards.
You can get Testnet Points by:
- Running Light rClients: Set up and manage rClients to support network operation.
- Completing Social Challenges: Engage with Rivalz posts and create quality content to maximize your points.
- Minting Data Fragmentz NFTs: Each Data Fragment carries a certain amount of Points. These are also essential to obtaining a significant discount (Intel Discount) for the whitelist phase of the Validator zNode sale.
To participate :
- Visit Rivalz Testnet to view the Minez dashboard where you can access everything related to the testnet.
- Join our Initiating Intel Galxe Campaign.
- Join our Discord, Telegram and follow the Twitter to stay updated on our developments & other opportunities to participate.
- Read the step-by-step Testnet Guide.
If you experience any issues with the Rivalz Testnet, please feel free to ask our team in the #testnet-chat on the Rivalz Discord.
Light rClients installation Guide
Part 1: Order and configure your VPS
To get started with installing your node, you’ll first need to rent a VPS (Virtual Private Server). Using a VPS offers several advantages, such as enhanced performance, scalability and reliability. I’ll guide you through the process of renting a VPS at a lower cost, and show you how to configure it. Follow the steps below to get your VPS ready for the node installation. Research VPS providers: Take some time to explore different VPS providers available in the market. Consider factors like pricing, reputation, and customer reviews to find the right fit for your needs. Look for plans that offer the appropriate amount of resources (CPU, RAM, storage) to support your node. Contabo is my preferred choice due to their combination of affordable pricing, reliable performance, and user-friendly interface. I’d like to clarify that I am not affiliated with their partner program and there are no personal benefits for me in recommending their service.
Contabo use කරනවනම් USD වෙනුවට Euro use කරන්න, $4.5 monthly fee එකක් වගේ තමයි තියෙන්නෙ.(පලවෙනි පාර setup fee එකක් යනවා.ඒක දෙවනි මාසයේ ඉදන් අය වෙන්නෙ නැහැ ) පෞද්ගලිකව මම paypal එක connect කරල තියෙන්නෙ.
Minimum hardware specifications needed for this node:
- 4 CPU
- 8 GB RAM
- 200 GB SSD/NVME
Part 2: Connect to your VPS via SSH
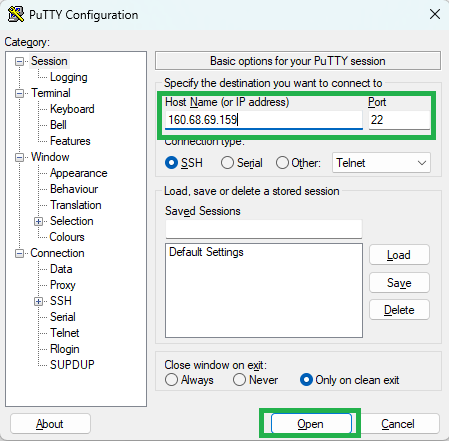
Download and install most recent edition of PuTTY by visiting the official website: https://www.chiark.greenend.org.uk/~sgtatham/putty/latest.html

You will find the IP adress of your VPS in the second email. Launch PuTTY, enter the IP address of your VPS and click “Open”:
Once the server interface is open, you will be prompted to provide login details; simply enter “root” as the user and use your chosen password:

Congratulations! You are now successfully logged into your server:

Part 3: installation Guide
- Update Package Lists
sudo apt update
This command updates the list of available packages and their versions, but it does not install or upgrade any packages.
- Upgrade Installed Packages
sudo apt upgrade
This command installs the newest versions of all packages currently installed on the system.
- Add a New User
sudo adduser airdroplk
This command creates a new user named airdroplk. You will be prompted to set a password and provide some additional information.
Replace your “airdroplk” to your name
- Add User to Groups:
usermod -aG sudo,adm airdroplk
This command adds the user airdroplk to the sudo and adm groups, granting administrative privileges.
- Switch to the New User:
sudo su airdroplk
This command switches the current user to airdroplk.
- Install Desktop Environment and Applications:
sudo apt-get install ubuntu-desktop firefox stacer mmv -y
This command installs the Ubuntu desktop environment, Firefox browser, Stacer (a system optimizer), and mmv (a utility for mass file renaming).
- Download xRDP Installer Script:
cd ~ && wget https://www.c-nergy.be/downloads/xRDP/xrdp-installer-1.4.zip
This command changes to the home directory and downloads the xRDP installer script from the given URL.
- Unzip the xRDP Installer Script:
unzip xrdp-installer-1.4.zip && less xrdp-installer-1.4.sh
This command unzips the downloaded file and opens the installer script for viewing.
- Make the xRDP Installer Script Executable and Run It:
chmod +x xrdp-installer-1.4.sh && ./xrdp-installer-1.4.sh
This command makes the xRDP installer script executable and then runs it to install xRDP, which allows remote desktop connections.
- Change xRDP Port
sudo sed -i 's/3389/51576/g' /etc/xrdp/xrdp.ini
This command modifies the xRDP configuration file to change the default port from 3389 to 51576.
- Change SSH Port:
sudo sed -i 's/#Port 22/Port 51575/g' /etc/ssh/sshd_config
This command modifies the SSH configuration file to change the default port from 22 to 51575.
- Allow Ports Through the Firewall:
sudo ufw allow 51576
sudo ufw allow 51575
sudo ufw enable
sudo ufw status numbered
These commands allow traffic through the new xRDP and SSH ports (51576 and 51575), enable the firewall, and then display the numbered list of firewall rules.
- Install and Enable Fail2Ban:
sudo apt install fail2ban
sudo systemctl enable fail2ban
sudo systemctl start fail2ban
These commands install Fail2Ban (which helps protect the server from brute-force attacks), enable it to start at boot, and start the service immediately.
- Update Package Lists Again:
sudo apt update
- Reboot the System:
sudo reboot
This command restarts the system to apply all changes and updates.
- Open Firefox:
firefox
- This command opens the Firefox browser.
By following these steps, you will have a system with a new user that has administrative privileges, a remote desktop setup using xRDP, custom SSH and xRDP ports for security, a firewall configured to allow these ports, and Fail2Ban for additional protection.


