1. Introduction… (හැදින්වීම)
Lava is a decentralized network of RPC and API providers that developers can subscribe to for access to any blockchain. Providers are rewarded for their quality of service, meaning apps and users get maximum speed, data integrity and uptime. Session pairings are regularly changed according to quality of service, so anyone can query or send transactions on-chain without being profiled or frontran. Lava helps developers build web3-native apps on any chain, while giving users the best possible experience.
2. Funding rounds

Lava has announced the closure of its $15M seed investment round3. Testnet Guide
3.1 Website Registration
- Registration : https://accounts.lavanet.xyz/register
- First name / Last name
- Email , Password
- How did you hear about us? (Optional)
- Invitation Code (Optional)
3.2 Zerely
- Registration : https://zealy.io/c/lavanetwork
- මේ Link(Not a ref link) එකෙන් ගිහින් Zerely එකේ තියන tasks ටික කරන්න. – https://zealy.io/c/lavanetwork
- එක task එකක් වත් miss කරගන්න එපා එහෙම උනොත් ඊලග task එකට eligible වෙන්න points මදි වෙනවා.
- Manual verify කරන tasks check කරලා point reward කරන්න 24H වගේ වෙලාවක් යනවා.
- Points උපරිමයෙන්ම අරගෙන Discord roles ටිකත් ලබාගන්න. ඉස්සරහට වැදගත් වෙන්න පුලුවන්.
3.3 Lava Points: Magma
- Registration : https://points.lavanet.xyz/register?code=E38QR
( මෙතනදි ref. link එකක් අනිවාර්යෙන් අවශ්ය වෙනවා register වෙන්න, ඒ නිසා මගෙ code එක මන් මෙතනදි දැම්මා. )
- Connect your wallet to our points dashboard: points.lavanet.xyz – code: E38QR
- Swap the RPC URLs in your wallets to the Lava-powered URLs on NEAR, Starknet, Evmos, Axelar and Ethereum
– Ethereum wallets
– NEAR wallets
– Evmos wallets
– Starknet wallets
– Axelar wallets - Use your wallet and dapps as normal and earn points
- View the leaderboard and check your ranking
- Share your referral code on socials to earn points
More info : https://www.lavanet.xyz/blog/introducing-magma-points
3.3 Node installation
Part 1: Order and configure your VPS
To get started with installing your node, you’ll first need to rent a VPS (Virtual Private Server). Using a VPS offers several advantages, such as enhanced performance, scalability and reliability. I’ll guide you through the process of renting a VPS at a lower cost, and show you how to configure it. Follow the steps below to get your VPS ready for the node installation. Research VPS providers: Take some time to explore different VPS providers available in the market. Consider factors like pricing, reputation, and customer reviews to find the right fit for your needs. Look for plans that offer the appropriate amount of resources (CPU, RAM, storage) to support your node. Contabo is my preferred choice due to their combination of affordable pricing, reliable performance, and user-friendly interface. I’d like to clarify that I am not affiliated with their partner program and there are no personal benefits for me in recommending their service.
Contabo use කරනවනම් USD වෙනුවට Euro use කරන්න, $4.5 monthly fee එකක් වගේ තමයි තියෙන්නෙ.(පලවෙනි පාර setup fee එකක් යනවා.ඒක දෙවනි මාසයේ ඉදන් අය වෙන්නෙ නැහැ ) පෞද්ගලිකව මම paypal එක connect කරල තියෙන්නෙ.
Minimum hardware specifications needed for this node:

- 6 CPU
- 16 GB RAM
- 400 GB SSD / 200 GB NVMe
Given the modest hardware requirements, I suggest opting for the Cloud VPS M package, as it offers a suitable balance of performance and efficiency for these needs.

I will initially select a rental period of 1 month, with the flexibility to extend it later if needed:

Make sure to choose the option “European Union (Germany)”:

For the best storage solution, I recommend selecting the 400GB SSD storage type. While it’s slightly below the recommended requirements, it should still be enough:

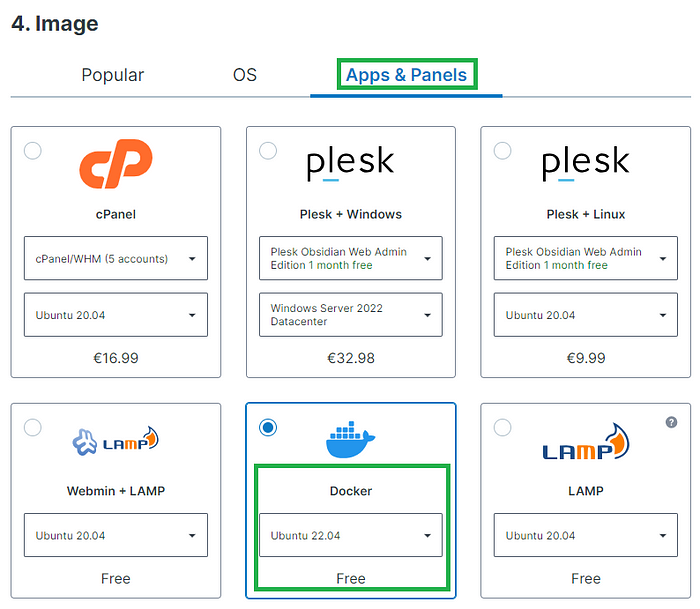
To access Docker with Ubuntu 22.04, navigate to the “Apps & Panels” section and make the appropriate selection:
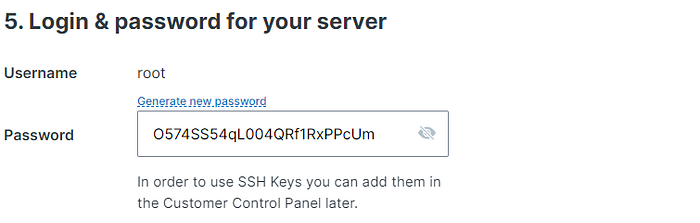
To prioritize security, I highly recommend to generate a password and securely store it to ensure maximum protection:
For the final step, it’s recommended to leave the sections titled “Object Storage”, “Networking”, and “Add-Ons” in their default state without any modifications. If you are new to Contabo, please create an account; otherwise, login using your existing credentials. Provide your personal data by filling in the required fields. Complete the remaining fields with your personal information, and click the “Next” button to proceed with the payment. After successfully completing the payment for your order, you will receive an initial email. Within approximately 15 minutes, you will receive a second email containing all the information needed to connect to your VPS.
Part 2: Connect to your VPS via SSH
Download and install most recent edition of PuTTY by visiting the official website:

You will find the IP adress of your VPS in the second email. Launch PuTTY, enter the IP address of your VPS and click “Open”:

Once the server interface is open, you will be prompted to provide login details; simply enter “root” as the user and use your chosen password:

Congratulations! You are now successfully logged into your server:

Install Docker (skip you already installed)
sudo apt -get update
sudo apt install docker.io
- Do you want to continue (y/N) – Type Y and click enter
sudo systemctl enable docker
sudo systemctl status docker
Part 3: Preparations
To continue, we can update the packages by running the following commands in the terminal. The first part of the command (sudo apt update) updates the package lists for upgrades, and the second part (sudo apt upgrade -y) actually performs the upgrades with the “-y” flag allowing for automatic confirmation of prompts during the upgrade process:
sudo apt update && sudo apt upgrade -y
Part 4: Setup validator name
First change “YOUR_MONIKER_GOES_HERE” to your chosen validator moniker and enter this command:
MONIKER="YOUR_MONIKER_GOES_HERE"

Part 5: Install dependencies & Install GO
# Install Build Tools
sudo apt -qy install curl git jq lz4 build-essential

# Install GO
sudo rm -rf /usr/local/go
curl -L https://go.dev/dl/go1.21.6.linux-amd64.tar.gz | sudo tar -xzf - -C /usr/local
echo 'export PATH=$PATH:/usr/local/go/bin:$HOME/go/bin' >> $HOME/.bash_profile
source .bash_profile
Part 6: Download and build binaries
Before proceeding, ensure you visit the Lava GitHub repository to verify the latest version. Look on the right-hand side of the page to determine the most recent release. Once you’ve identified the latest version, update the command “git checkout” accordingly to reflect this newest version.
# Clone project repository
cd && rm -rf lava
git clone https://github.com/lavanet/lava.git
cd lava
git checkout v_replace_this_to_ latest_version
- Example (Don’t copy this)
git checkout v0.34.0
# Build binaries
export LAVA_BINARY=lavad
make install
Part 07 : Initialize the node
# Download genesis and addrbook fileslavad config chain-id lava-testnet-2
lavad config keyring-backend test
lavad config node tcp://localhost:19957
# Initialize the node- Change “Your Node Name” before pasting
lavad init "Your Node Name" --chain-id lava-testnet-2
Part 08 : Download latest chain snapshot
# Download genesis and addrbook filescurl -L https://snapshots-testnet.nodejumper.io/lava-testnet/genesis.json > $HOME/.lava/config/genesis.json
# Set seedssed -i -e 's|^seeds *=.*|seeds = "3a445bfdbe2d0c8ee82461633aa3af31bc2b4dc0@prod-pnet-seed-node.lavanet.xyz:26656,e593c7a9ca61f5616119d6beb5bd8ef5dd28d62d@prod-pnet-seed-node2.lavanet.xyz:26656,ade4d8bc8cbe014af6ebdf3cb7b1e9ad36f412c0@testnet-seeds.polkachu.com:19956"|' $HOME/.lava/config/config.toml
# Set minimum gas pricesed -i -e 's|^minimum-gas-prices *=.*|minimum-gas-prices = "0.000000001ulava"|' $HOME/.lava/config/app.toml
# Set pruningsed -i \
-e 's|^pruning *=.*|pruning = "custom"|' \
-e 's|^pruning-keep-recent *=.*|pruning-keep-recent = "100"|' \
-e 's|^pruning-interval *=.*|pruning-interval = "17"|' \
  $HOME/.lava/config/app.toml
# Change portssed -i -e "s%:1317%:19917%; s%:8080%:19980%; s%:9090%:19990%; s%:9091%:19991%; s%:8545%:19945%; s%:8546%:19946%; s%:6065%:19965%" $HOME/.lava/config/app.toml
sed -i -e "s%:26658%:19958%; s%:26657%:19957%; s%:6060%:19960%; s%:26656%:19956%; s%:26660%:19961%" $HOME/.lava/config/config.toml
# Download latest chain data snapshotcurl "https://snapshots-testnet.nodejumper.io/lava-testnet/lava-testnet_latest.tar.lz4" | lz4 -dc - | tar -xf - -C "$HOME/.lava"
# Set minimum gas price
sed -i -e "s|^minimum-gas-prices *=.*|minimum-gas-prices = \"0ulava\"|" $HOME/.lava/config/app.toml
# Create a servicesudo tee /etc/systemd/system/lavad.service > /dev/null << EOF
[Unit]
Description=Lava node service
After=network-online.target
[Service]
User=$USER
ExecStart=$(which lavad) start
Restart=on-failure
RestartSec=10
LimitNOFILE=65535
[Install]
WantedBy=multi-user.target
EOF
sudo systemctl daemon-reload
sudo systemctl enable lavad.service
Part 09 : Start service and check the logs
# Start the service and check the logssudo systemctl start lavad.service
sudo journalctl -u lavad.service -f --no-hostname -o cat
Part 10 : Create Validator
# create wallet(If you already have a wallet skip the first step if not create a new wallet )- Create a new wallet :
lavad keys add wallet
## console output:
#- name: wallet
#  type: local
#  address: lava@1us3tv59r3wz57ydjafkzgpy0pccae2a2e4k5en
#  pubkey: '{"@type":"/cosmos.crypto.secp256k1.PubKey","key":"Auq9WzVEs5pCoZgr2WctjI7fU+lJCH0I3r6GC1oa0tc0"}'
#  mnemonic: ""

#!!! SAVE SEED PHRASE (example)

kite upset hip dirt pet winter thunder slice parent flag sand express suffer chest custom pencil mother bargain remember patient other curve cancel sweet- Import your exciting wallet :
lavad keys add wallet --recover
#!!! SAVE PRIVATE VALIDATOR KEYcat $HOME/.lava/config/priv_validator_key.json
Part 11: Obtain Funds from the Lava Network Testnet Faucet
To receive funds, visit the #faucet channel on the official Lava Network Discord server. Here, you can request funds by sharing the address you previously created. Once in the channel, submit your request by typing $request followed by your address. For instance, you would type this to request funds for that specific address:
$request lava@1ck9q973w5mq42qeqc7000nr7zgrty08x2z4vwq
$request youraddress
Ensure that you have successfully received 1,000,00 ulava.
# verify the balancelavad q bank balances $(lavad keys show wallet -a)
## console output:
#  balances:
#  - amount: "10000000"
#    denom: ulava
Part 12: Create the Validator
Unlike traditional Cosmos SDK chains, establishing a validator on Lava Network requires using the lavad tx staking create-validator command. This process assumes the presence of a BLS validator key in the $HOME/.lava/config/.json file.
Check the network synchronization status with the command
lavad status 2>&1 | jq .SyncInfo.catching_up
As soon as the value of catching_up becomes “false”, you can proceed to the final step and create your validator
# Make sure you have adjusted **moniker**, **details** and **website** to match your values.
lavad tx staking create-validator \
--amount=9000000ulava \
--pubkey=$(lavad tendermint show-validator) \
--moniker "YOUR_MONIKER_NAME" \
--details "YOUR_DETAILS" \
--website "YOUR_WEBSITE_URL" \
--chain-id=lava-testnet-2 \
--commission-rate=0.1 \
--commission-max-rate=0.2 \
--commission-max-change-rate=0.05 \
--min-self-delegation=1 \
--fees=10000ulava \
--from=wallet \
-y
Now make sure you see the validator details:
lavad q staking validator $(lavad keys show wallet --bech val -a)
To achieve active validator status, it’s essential to bond more ulava tokens than the current lowest-bonded validator in the ranking (unless the validator set isn’t full). Additionally, you must have a minimum of 1,000,000 ulava tokens bonded.
Congratulations! You’ve successfully become a validator on the Lava Network. Within 30 minutes, the validator should appear in the list at https://lava.explorers.guru/validators (you can find it by searching for the wallet address or your Moniker, and then see it in the delegations to your validator on this wallet).
Please keep in mind that your node will initially be listed as “inactive” when it first appears. In order to become an active validator, you need to have more ulava tokens bonded than the last validator, so to have more voting power than the last validator, which is 159, 000 LAVA at the moment of writing. Therefore, you need to obtain a lot of testnet tokens from the faucet and then delegate these tokens to your node by using the following command
lavad tx staking delegate YOUR_NODE_OPERATOR_ADRESS_HERE 100000ulava --from wallet --chain-id lava-testnet-2
If you encounter any issues, I recommend consulting the official documentation first. For tasks like creating a backup of your keys, your node, or updating lavad, please also refer to the official guides. You can also refer to the handy cheat sheet provided by Node Jumper. If you still need assistance, feel free to post your questions in the “Validators” channel on the official Discord server. Alternatively, you’re always welcome to reach out to me directly for assistance.
This post was originally published on the @ilaNihas / Node jumper’s pages .However, I followed both articles and modified them a little bit.


