Introduction… (හැදින්වීම)
Bitcoin has primarily operated as a Proof-of-Work (PoW) blockchain, relying on miners to secure the network through the process of solving complex cryptographic puzzles. However, the concept of a Bitcoin-based Proof-of-Stake (PoS) chain has been a topic of discussion and exploration within the cryptocurrency community.
It’s important to note that the transition from PoW to PoS for a blockchain as significant as Bitcoin would be a complex and contentious process, and as of my last update, Bitcoin remains a PoW blockchain. However, various projects and proposals have explored the idea of introducing PoS elements to the Bitcoin network or creating PoS sidechains linked to the Bitcoin ecosystem.
While specific PoS chains directly based on Bitcoin may not have been widely implemented, the broader cryptocurrency ecosystem has seen the emergence of numerous PoS-based blockchains, such as Ethereum 2.0, Cardano, and Tezos, which have implemented or are in the process of implementing PoS consensus mechanisms.
Bitcoin can contribute to the security of other chains through a process called cross-chain staking. Cross-chain staking involves staking bitcoins on a Proof-of-Stake (PoS) chain to help secure that chain. By staking bitcoins on a PoS chain, bitcoin holders can earn rewards for contributing to the security of the PoS chain, while also benefiting from potential price appreciation of the staked bitcoins.
The Babylon Bitcoin staking protocol is an example of a cross-chain staking solution that allows bitcoin holders to stake their bitcoins without bridging them to the PoS chain. This means that the staked bitcoins remain on the Bitcoin network, while still contributing to the security of the PoS chain.
In terms of using Bitcoin as collateral, there are various projects and proposals exploring the idea of using Bitcoin as collateral to secure other chains or assets. For example, the Wrapped Bitcoin (WBTC) project is an ERC-20 token that is backed 1:1 by Bitcoin and can be used as collateral on the Ethereum network. Similarly, the RenVM project allows users to mint RenBTC, which is a tokenized version of Bitcoin that can be used as collateral on various blockchains.
Babylon Bitcoin staking protocol does not use the same mechanism as a collateralized token like Wrapped Bitcoin (WBTC) or RenBTC. While both solutions involve using Bitcoin to secure other chains or assets, they operate in different ways.
Collateralized tokens like WBTC and RenBTC are created by locking up Bitcoin on the Bitcoin network and issuing a corresponding token on another blockchain. These tokens are backed 1:1 by Bitcoin and can be used as collateral to access liquidity or other services on the other blockchain.
In contrast, the Babylon Bitcoin staking protocol allows bitcoin holders to stake their bitcoins on a Proof-of-Stake (PoS) chain to help secure that chain. The staked bitcoins remain on the Bitcoin network, while still contributing to the security of the PoS chain. The Babylon protocol is designed to provide strong security guarantees to both the consumer PoS chains and the provider bitcoin holders, while also supporting fast stake unbonding to maximize liquidity for bitcoin holders
The Babylon Bitcoin staking protocol has several unique features that set it apart from other staking protocols. Here are some of the key features:
1. Cross-Chain Staking : The Babylon protocol allows bitcoin holders to stake their bitcoins without bridging them to the PoS chain. This means that the staked bitcoins remain on the Bitcoin network, while still contributing to the security of the PoS chain.
2. Full Slashability : The Babylon protocol is fully slashable, meaning that if a staker violates the PoS protocol, 1/3 of their staked bitcoins will be slashed as a penalty. This provides a strong incentive for stakers to follow the PoS protocol honestly and helps to ensure the security of the PoS chain.
3. Staker Security and Liquidity : The Babylon protocol guarantees staker security and fast stake unbonding, which maximizes liquidity for bitcoin holders. This means that stakers can quickly and easily withdraw their staked bitcoins if needed, providing a degree of flexibility and liquidity that can be beneficial for investors.
4.Modular Design : The Babylon protocol is designed as a modular plug-in that can be used on top of many different PoS consensus algorithms. This provides flexibility and allows the protocol to be adapted to different PoS chains and use cases.
5. System Architecture : The Babylon protocol is designed to scale to many stakers and many PoS chains, with a Bitcoin-staked Babylon chain acting as a control plane to synchronize between Bitcoin and the PoS chains. This architecture enables efficient timestamp aggregation for any number of Cosmos SDK chains via the standard IBC (inter-blockchain communication) protocol.
There are several ways in which a staker can violate the PoS protocol, which can result in a penalty or slashing of their staked bitcoins. Here are some examples:
1. Double-Spending : If a staker attempts to double-spend their staked coins, this would be a violation of the PoS protocol and could result in a penalty.
2. Failing to Validate Transactions : Stakers are responsible for validating transactions on the PoS chain. If a staker fails to validate transactions or otherwise fails to perform their duties as a validator, this could be considered a violation of the PoS protocol.
3. Collusion : If multiple stakers collude to manipulate the PoS chain or otherwise violate the protocol, this could result in a penalty for all involved stakers.
4. Failing to Participate : Some PoS protocols require stakers to participate in block production or other network activities. If a staker fails to participate as required, this could be considered a violation of the protocol.
5. Attempting to Attack the Network : If a staker attempts to attack the PoS network or otherwise undermine its security, this would be a clear violation of the protocol and could result in a penalty.
There are several reasons why someone might choose to stake their BTC using the Babylon Bitcoin staking protocol instead of simply holding it:
1. Earn yield: By staking their BTC, users can earn yield in the form of rewards paid out by the PoS chain. This can provide a way to generate passive income from their BTC holdings.
2. Support the security of PoS chains: By staking their BTC, users can help to secure PoS chains and contribute to the overall security of the blockchain ecosystem. This can be seen as a way to support the growth and development of the blockchain industry.
3. Diversify their portfolio: By staking their BTC on a PoS chain, users can diversify their portfolio and potentially reduce their exposure to market volatility. This can be seen as a way to manage risk and potentially increase returns over the long term.
4. Access new investment opportunities: By staking their BTC on a PoS chain, users may be able to access new investment opportunities that are not available through traditional financial channels. This can be seen as a way to participate in the growth of the blockchain industry and potentially benefit from new innovations and developments.
As with any investment or financial activity, there are risks associated with using the Babylon Bitcoin staking protocol. Some potential risks for bitcoin holders using this contract include:
1. Slashing risk : The Babylon protocol is designed to provide full slashable PoS security, which means that if there is a safety violation, 1/3 of the staked bitcoins are guaranteed to be slashed. While this mechanism is intended to deter bad actors and ensure the security of the PoS chain, it also means that bitcoin holders could potentially lose a portion of their staked bitcoins if a safety violation occurs.
2. Smart contract risk : While the Babylon protocol does not require smart contracts on the Bitcoin network, it does involve interacting with smart contracts on the PoS chain. As with any smart contract, there is a risk of bugs or vulnerabilities that could be exploited by attackers.
3. Market risk : The value of bitcoins can fluctuate significantly, and the value of staked bitcoins may be impacted by market conditions. Additionally, the value of rewards earned through staking may be impacted by changes in the market value of the PoS chain’s native token.
4. Liquidity risk : While the Babylon protocol is designed to support fast stake unbonding to maximize liquidity for bitcoin holders, there may still be some risk associated with the ability to quickly and easily sell or transfer staked bitcoins.
Funding rounds
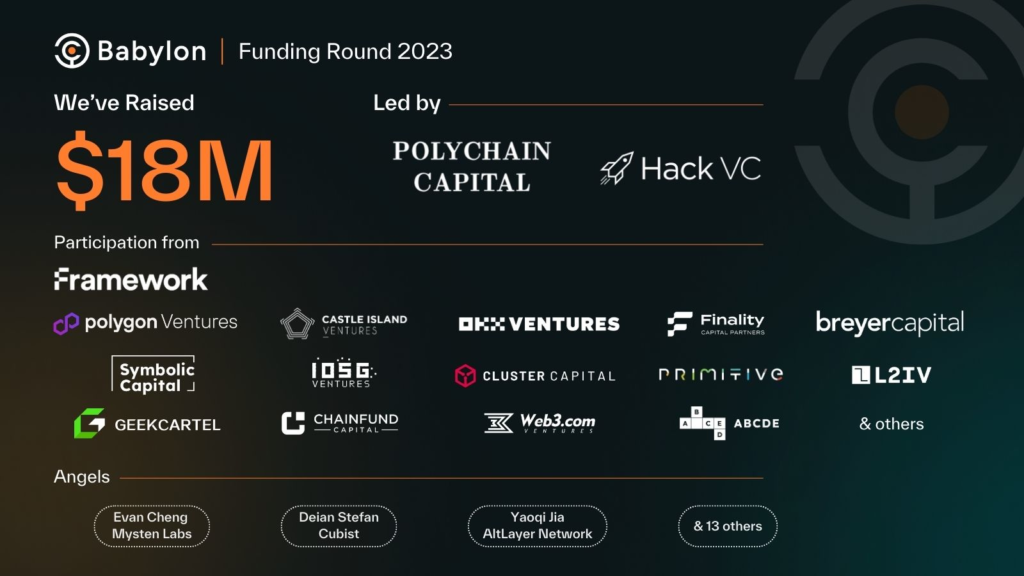
More infomation : https://cryptorank.io/ico/babylon-chain
Litepaper
https://docs.babylonchain.io/assets/files/btc_staking_litepaper-32bfea0c243773f0bfac63e148387aef.pdf
ALT Layer – Babylon Partnership

AltLayer is proud to present new research for a decentralized verification layer that leverages @bitcoin staking for security, in collaboration with babylon chain
More info : Introducing Bitcoin Security to Thousands of Rollups
Testnet guide
1. Waitlist Registration :
- join waitlist phrase 1: https://waitlist.babylonchain.io/c0d0ab0f
Please note that phrase 1 is currently ended ! phrase 2 is coming soon. if you already participated in their phrase 1 waitlist campaign check your position.
2. Fill out the form to participate in the Ambassador Program :
- Ambassador form link : https://docs.google.com/forms/d/e/1FAIpQLSdHMwDlQB4MyEoL6vS7lge1A7t_K6_GYt-2VZzjAXkVPamHMw/viewform
Be active in their discord channel and level up your account , If you have any question please ask moderators.
3. Zerely :
- මේ Link(Not a ref link) එකෙන් ගිහින් Zerely එකේ තියන tasks ටික කරන්න. – https://zealy.io/c/babylonchain
- එක task එකක් වත් miss කරගන්න එපා එහෙම උනොත් ඊලග task එකට eligible වෙන්න points මදි වෙනවා.
- Manual verify කරන tasks check කරලා point reward කරන්න 24H වගේ වෙලාවක් යනවා.
- Points උපරිමයෙන්ම අරගෙන Discord roles ටිකත් ලබාගන්න. ඉස්සරහට වැදගත් වෙන්න පුලුවන්.
You also have the option to join the Babylon Community on Zealy and take part in the various quests listed under #Babylonian, #Advanced, #Senior, and #Master categories
4. Node installation :
Part 1: Order and configure your VPS
To get started with installing your node, you’ll first need to rent a VPS (Virtual Private Server). Using a VPS offers several advantages, such as enhanced performance, scalability and reliability. I’ll guide you through the process of renting a VPS at a lower cost, and show you how to configure it. Follow the steps below to get your VPS ready for the node installation. Research VPS providers: Take some time to explore different VPS providers available in the market. Consider factors like pricing, reputation, and customer reviews to find the right fit for your needs. Look for plans that offer the appropriate amount of resources (CPU, RAM, storage) to support your node. Contabo is my preferred choice due to their combination of affordable pricing, reliable performance, and user-friendly interface. I’d like to clarify that I am not affiliated with their partner program and there are no personal benefits for me in recommending their service.
Contabo use කරනවනම් USD වෙනුවට Euro use කරන්න, $4.5 monthly fee එකක් වගේ තමයි තියෙන්නෙ.(පලවෙනි පාර setup fee එකක් යනවා.ඒක දෙවනි මාසයේ ඉදන් අය වෙන්නෙ නැහැ ) පෞද්ගලිකව මම paypal එක connect කරල තියෙන්නෙ.
Minimum hardware specifications needed for this node:
- 4 CPU
- 6 GB RAM
- 50 GB SSD
Given the modest hardware requirements, I suggest opting for the Cloud VPS S package, as it offers a suitable balance of performance and efficiency for these needs.

I will initially select a rental period of 1 month, with the flexibility to extend it later if needed:

Make sure to choose the option “European Union (Germany)”:

For the best storage solution, I recommend selecting the 200GB SSD storage type.

To access Docker with Ubuntu 22.04, navigate to the “Apps & Panels” section and make the appropriate selection:

To prioritize security, I highly recommend to generate a password and securely store it to ensure maximum protection:

For the final step, it’s recommended to leave the sections titled “Object Storage”, “Networking”, and “Add-Ons” in their default state without any modifications. If you are new to Contabo, please create an account; otherwise, login using your existing credentials. Provide your personal data by filling in the required fields. Complete the remaining fields with your personal information, and click the “Next” button to proceed with the payment. After successfully completing the payment for your order, you will receive an initial email. Within approximately 15 minutes, you will receive a second email containing all the information needed to connect to your VPS.
Part 2: Connect to your VPS via SSH
Download and install most recent edition of PuTTY by visiting the official website: https://www.chiark.greenend.org.uk/~sgtatham/putty/latest.html

You will find the IP adress of your VPS in the second email. Launch PuTTY, enter the IP address of your VPS and click “Open”:

Once the server interface is open, you will be prompted to provide login details; simply enter “root” as the user and use your chosen password:

Congratulations! You are now successfully logged into your server:

Install Docker (skip you already installed)
sudo apt -get update
sudo apt install docker.io
- Do you want to continue (y/N) – Type Y and click enter
sudo systemctl enable docker
sudo systemctl status docker
Part 3: Preparations
To continue, we can update the packages by running the following commands in the terminal. The first part of the command (sudo apt update) updates the package lists for upgrades, and the second part (sudo apt upgrade -y) actually performs the upgrades with the “-y” flag allowing for automatic confirmation of prompts during the upgrade process:
sudo apt update && sudo apt upgrade -y
Part 4: Setup validator name
First change “YOUR_MONIKER_GOES_HERE” to your chosen validator moniker and enter this command:
MONIKER="YOUR_MONIKER_GOES_HERE"

Part 5: Install dependencies & Install GO
# Install Build Tools
sudo apt -qy install curl git jq lz4 build-essential

# Install GO
sudo rm -rf /usr/local/go
curl -Ls https://go.dev/dl/go1.20.12.linux-amd64.tar.gz | sudo tar -xzf - -C /usr/local
eval $(echo 'export PATH=$PATH:/usr/local/go/bin' | sudo tee /etc/profile.d/golang.sh)
eval $(echo 'export PATH=$PATH:$HOME/go/bin' | tee -a $HOME/.profile)

Part 6: Download and build binaries
# Clone project repository
copy and paste one by one (එකෙන් එකට copy-paste කරන්න.)
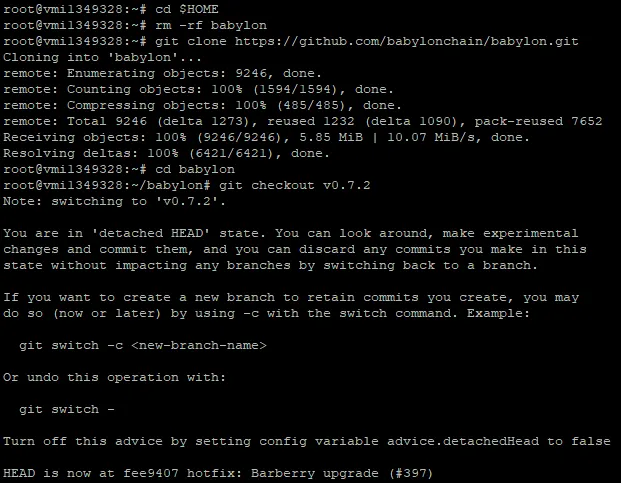
cd $HOME
rm -rf babylon
git clone https://github.com/babylonchain/babylon.git
cd babylon
git checkout v0.7.2
# Build binaries
make build
#Prepare binaries for Cosmovisorinaries
copy and paste one by one (එකෙන් එකට copy-paste කරන්න.)
mkdir -p $HOME/.babylond/cosmovisor/genesis/bin
mv build/babylond $HOME/.babylond/cosmovisor/genesis/bin/
rm -rf build
# Create application symlinks
sudo ln -s $HOME/.babylond/cosmovisor/genesis $HOME/.babylond/cosmovisor/current -f
sudo ln -s $HOME/.babylond/cosmovisor/current/bin/babylond /usr/local/bin/babylond -f

Part 7: Set up Cosmovisor and create the corresponding service
# Download and install Cosmovisor
go install cosmossdk.io/tools/cosmovisor/cmd/cosmovisor@latest

# Create and start service
sudo tee /etc/systemd/system/babylon.service > /dev/null << EOF
[Unit]
Description=babylon node service
After=network-online.target

[Service]
User=$USER
ExecStart=$(which cosmovisor) run start
Restart=on-failure
RestartSec=10
LimitNOFILE=65535
Environment="DAEMON_HOME=$HOME/.babylond"
Environment="DAEMON_NAME=babylond"
Environment="UNSAFE_SKIP_BACKUP=true"
Environment="PATH=/usr/local/sbin:/usr/local/bin:/usr/sbin:/usr/bin:/sbin:/bin:/usr/games:/usr/local/games:/snap/bin:$HOME/.babylond/cosmovisor/current/bin"

[Install]
WantedBy=multi-user.target
EOF
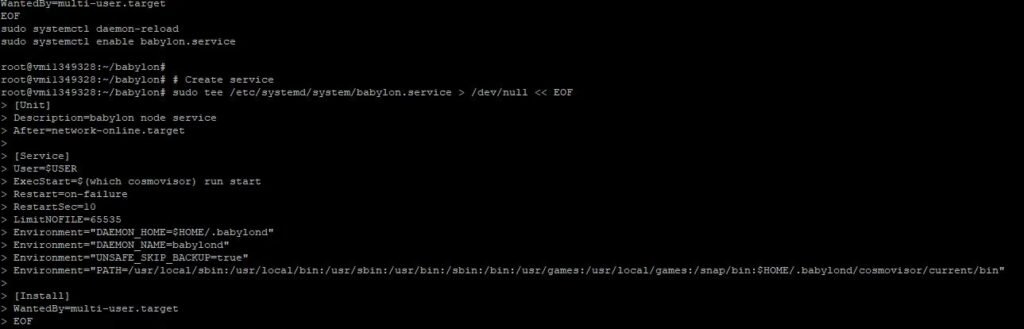
sudo systemctl daemon-reload
sudo systemctl enable babylon.service

Part 8: Initialize the node
# Set node configuration
babylond config chain-id bbn-test-2
babylond config keyring-backend test
babylond config node tcp://localhost:16457
# Initialize the node
babylond init $MONIKER --chain-id bbn-test-2
# Download genesis and addressbook
curl -Ls https://snapshots.kjnodes.com/babylon-testnet/genesis.json > $HOME/.babylond/config/genesis.json
curl -Ls https://snapshots.kjnodes.com/babylon-testnet/addrbook.json > $HOME/.babylond/config/addrbook.json
# Add seeds
sed -i -e "s|^seeds *=.*|seeds = \"3f472746f46493309650e5a033076689996c8881@babylon-testnet.rpc.kjnodes.com:16459\"|" $HOME/.babylond/config/config.toml
# Set minimum gas price
sed -i -e "s|^minimum-gas-prices *=.*|minimum-gas-prices = \"0.00001ubbn\"|" $HOME/.babylond/config/app.toml
# Set pruning
sed -i \
-e 's|^pruning *=.*|pruning = "custom"|' \
-e 's|^pruning-keep-recent *=.*|pruning-keep-recent = "100"|' \
-e 's|^pruning-keep-every *=.*|pruning-keep-every = "0"|' \
-e 's|^pruning-interval *=.*|pruning-interval = "19"|' \
$HOME/.babylond/config/app.toml
$HOME/.babylond/config/app.toml
# Set custom ports
sed -i -e "s%^proxy_app = \"tcp://127.0.0.1:26658\"%proxy_app = \"tcp://127.0.0.1:16458\"%; s%^laddr = \"tcp://127.0.0.1:26657\"%laddr = \"tcp://127.0.0.1:16457\"%; s%^pprof_laddr = \"localhost:6060\"%pprof_laddr = \"localhost:16460\"%; s%^laddr = \"tcp://0.0.0.0:26656\"%laddr = \"tcp://0.0.0.0:16456\"%; s%^prometheus_listen_addr = \":26660\"%prometheus_listen_addr = \":16466\"%" $HOME/.babylond/config/config.toml
sed -i -e "s%^address = \"tcp://localhost:1317\"%address = \"tcp://0.0.0.0:16417\"%; s%^address = \":8080\"%address = \":16480\"%; s%^address = \"localhost:9090\"%address = \"0.0.0.0:16490\"%; s%^address = \"localhost:9091\"%address = \"0.0.0.0:16491\"%; s%:8545%:16445%; s%:8546%:16446%; s%:6065%:16465%" $HOME/.babylond/config/app.toml

Part 9: Download latest chain snapshot
curl -L https://snapshots.kjnodes.com/babylon-testnet/snapshot_latest.tar.lz4 | tar -Ilz4 -xf - -C $HOME/.babylond
[[ -f $HOME/.babylond/data/upgrade-info.json ]] && cp $HOME/.babylond/data/upgrade-info.json $HOME/.babylond/cosmovisor/genesis/upgrade-info.json

Part 10: Start service and check the logs
sudo systemctl start babylon.service && sudo journalctl -u babylon.service -f --no-hostname -o cat

Enter ATL+C to exit the logs.
Part 11: Becoming a Validator
- Keyring creation and getting funds: Validators are required to have funds for two reasons:
- Self-delegation: Validators must stake their own funds as a commitment to the network.
- Transaction fees: Funds are necessary to cover the costs of submitting BLS signature transactions.
Presently, validators are limited to using the test keyring backend. However, Babylon plans to expand support to include various encrypted backends offered by the Cosmos SDK in the future.
Part 11a: Create a New Key
babylond keys add wallet
- This will generate a wallet address, key and seed. Save it for future use.
- In next lines it may ask to confirm IP address and seed phrase. Provide accordingly and move forward.

Part 11b: Obtain Funds from the Babylon Testnet Faucet
To receive funds, visit the #faucet channel on the official Babylon Discord server. Here, you can request funds by sharing the address you previously created. Please note, in order to access the #faucet channel, you first need to visit the “get-a-role” channel and react with the “Computer” emoji. This action will grant you the necessary permissions to view the #faucet channel. Once in the channel, submit your request by typing !faucet followed by your address. For instance, you would type this to request funds for that specific address:
!faucet bbn16yzx3zfucs6fxu4hw3ack6ht4hgsp9wqrly2c9

!faucet youraddress
You can check your wallet balance using this command:
babylond q bank balances $(babylond keys show wallet -a)

Ensure that you have successfully received 1,100,000 ubbn.
Part 11c: Generate a BLS Key Pair
As a validator, you are required to provide a BLS signature at the conclusion of each epoch. For this purpose, it’s essential to possess a BLS key pair, which will be used for signing information. This should be done using the address that was established in the preceding step.
babylond create-bls-key $(babylond keys show wallet -a)
Executing this command will generate a BLS key, which will then be stored in the $HOME/.babylond/config/priv_validator_key.json file. This file also contains the private key used by the validator for block signing. It’s crucial to secure this file adequately to maintain the integrity and security of your validator operations. After creating a BLS key, you need to restart your node to load this key into memory.
sudo systemctl restart babylon.service
Part 11d: Update the Configuration Settings
Additionally, it’s necessary to define the name of the key your validator will utilize for submitting BLS signature transactions. This is done in the $HOME/.babylond/config/app.toml file. You should edit this file to assign the key name to the one associated with the funds in your keyring.
sed -i -e "s|^key-name *=.*|key-name = \"wallet\"|" $HOME/.babylond/config/app.toml
Lastly, it is highly advisable to adjust the timeout_commit parameter in the $HOME/.babylond/config/config.toml file. This setting determines the duration a validator waits before committing a block and proceeding to a new height. In alignment with Babylon’s goal of maintaining a 10-second interval between blocks, you should configure this value accordingly.
sed -i -e "s|^timeout_commit *=.*|timeout_commit = \"10s\"|" $HOME/.babylond/config/config.toml
Part 12: Create the Validator
Unlike traditional Cosmos SDK chains, establishing a validator on Babylon requires using the babylond tx checkpointing create-validator command. This process assumes the presence of a BLS validator key in the $HOME/.babylond/config/priv_validator_key.json file.
Babylon validators have the responsibility to submit a BLS signature transaction at the end of each epoch, which currently occurs approximately every 30 minutes. These transactions incur a fixed gas fee of 100ubbn. Consequently, it’s crucial for validators to ensure they have sufficient unbonded funds in their keyring to cover these recurring transaction fees.
Check the network synchronization status with the command:
babylond status | jq .SyncInfo
As soon as the value of catching_up becomes “false”, you can proceed to the final step.
# Make sure you have adjusted **moniker**, **details** and **website** to match your values.
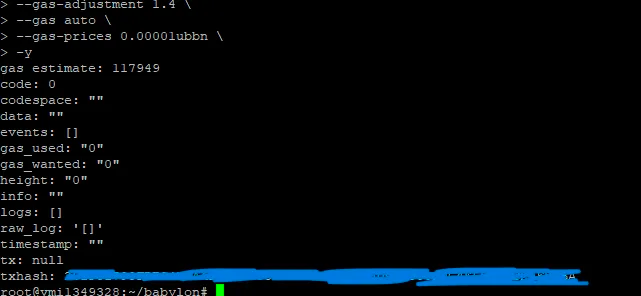
babylond tx checkpointing create-validator \
--amount 1000000ubbn \
--pubkey $(babylond tendermint show-validator) \
--moniker "YOUR_MONIKER_NAME" \
--details "YOUR_DETAILS" \
--website "YOUR_WEBSITE_URL" \
--chain-id bbn-test-2 \
--commission-rate 0.05 \
--commission-max-rate 0.20 \
--commission-max-change-rate 0.01 \
--min-self-delegation 1 \
--from wallet \
--gas-adjustment 1.4 \
--gas auto \
--gas-prices 0.00001ubbn \
-y
To achieve active validator status, it’s essential to bond more ubbn tokens than the current lowest-bonded validator in the ranking (unless the validator set isn’t full). Additionally, you must have a minimum of 10,000,000 ubbn tokens bonded.
Congratulations! You’ve successfully become a validator on the Babylon network. Within 30 minutes, the validator should appear in the list at https://babylon.explorers.guru/validators (you can find it by searching for the wallet address or your Moniker, and then see it in the delegations to your validator on this wallet).
Please keep in mind that your node will initially be listed as “inactive” when it first appears

In order to become an active validator, you need to have more ubbn tokens bonded than the last validator, so to have more voting power than the last validator, which is 339 BBN at the moment of writing. Therefore, you need to obtain a lot of testnet tokens from the faucet and then delegate these tokens to your node by using the following command:
#Get the validator address here.(You should need to delegate tokens to this address, not your wallet address.
babylond keys show <wallet name> --bech val -a
Delegate tokens to validator
babylond tx epoching delegate <validate_address> 1000000ubbn --from wallet --chain-id bbn-test-2 --gas-adjustment 1.4 --gas auto --fees 10ubbn -y
Part 13: Monitor status
sudo journalctl -u babylon.service -f --no-hostname -o cat
re no error message, then its working fine.If you encounter any issues, I recommend consulting the official documentation first. You can also refer to the handy cheat sheet provided by Node Jumper. If you still need assistance, feel free to post your questions in the “Development” channel on the official Discord server. Alternatively, you’re always welcome to reach out to me directly for assistance.
Error Correction
1. How often can we request tokens from the faucet per day?
You can claim Faucet once a day (once every 24 hours)
babylond q bank balances $(babylond keys show wallet -a)
balances: []
pagination:
next_key: null
total: “0”
- If the balance is not showing correctly, you need to wait patiently until the node syncs.
babylond status | jq .SyncInfo
“catching_up”: true
- you need to wait patiently until the node syncs.
This post was originally published on the @ilaNihas and @makwana1 Medium pages! However, I followed both articles and modified them a little bit.